How to Install a Sump Pump in 6 Easy Steps for a Dry Basement
Why put up with water in your basement any longer? It’s a common problem, but it doesn’t do your home or your family’s health any favors.
Ready to create a dry basement? Your home can greatly benefit from a professional sump pump installation. A sump pump is an important piece of the basement waterproofing puzzle.
For effective sump pump installation, look no further than Groundworks. Our certified basement waterproofers can install a complete sump pump system in just one visit to your home! Learn how as we outline the 6-step process in this article.
Why Do I Need a Sump Pump?
A sump pump removes your basement’s No. 1 enemy: water. Any moisture in your basement can be detrimental to your home’s safety, including these common problem signs:
When a quality sump pump system is installed with other basement waterproofing solutions, you prevent these issues, achieve a dry basement, and create a safer and healthier home for your family.
How Do You Install a Sump Pump?
Installing a basement sump pump may seem straightforward, but it’s a project best handled by trained professionals like your local Groundworks Company. Proper installation requires precise placement, correct pump sizing, and a reliable drainage setup to ensure the system works efficiently and won’t fail during heavy rain. Professionals also know how to address potential issues—such as improper grading, hidden leaks, or electrical hazards—that DIY attempts might overlook.
How Does Groundworks Install a Basement Sump Pump?
Every home is unique, but here are six essential steps our basement waterproofing technicians take when installing a sump pump system.

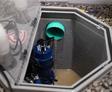
Step 1: Placing the Sump Pump Liner
First, an appropriately sized sump pump pit is excavated for the liner and pump. This protects your sump pump from the mud and debris around the pump pit.
Sump pumps are most effective at removing water from under your basement floor when they are located in the lowest spot on the floor. Your inspector determines this area by using a laser level. If the sump cannot be installed directly there, a PVC feed line should be installed through the floor to channel water from the low spot to the sump pump location.
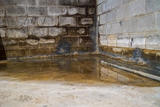
Step 2: Installing a Perimeter Drain System
During a basement sump pump installation, it’s a good idea to also install an interior perimeter drainage system. These drains collect water from the cove joint, the basement walls, and from under the basement floor and direct it to the installed sump pump.
First, the floor around the edge of the basement is jackhammered, and a layer of clean stone is set down. A perimeter drain is installed on top of the stone, and the trench is backfilled with more clean stone.
Our patented BasementGutter™ Basement Drainage System includes a wall flange that extends slightly up the basement wall to collect water that may leak from the walls. When we install a wall vapor barrier, we tuck it behind the flange to direct moisture from the walls into your drain. If your home has concrete block walls, weep holes are drilled in the blocks at the very bottom to relieve the water and pressure from the walls.
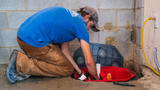
Step 3: The Sump Pump Installation
A special outlet connects the perimeter drain to the sump pump system, and clean gravel is backfilled around the sump pump liner. This gravel helps to keep your sump pump system as clean as possible, discouraging silt and sediment from entering the liner.
An airtight sump pump lid, including rubber grommets around all pipes and wires, keeps odors and humidity from escaping the sump pit while also preventing items and debris from falling in from the basement floor.
If you have a secondary pump installed in the pit, an additional discharge line is installed. This prevents the pipes from being overwhelmed and ensures the pumps won’t pump back and forth between each other. Discharge lines should never be tied together inside your home.

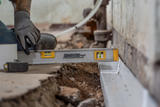
Step 4: Restore the Floor
To complete the sump pump installation, the floor is restored to a flush level for a clean, attractive look.
The system we use does not leave a gap around the perimeter of the basement floor, which can collect dust, debris, and other items that can clog your waterproofing system. This helps ensure better drainage and a more reliable system.
Step 5: The Cleanup & Finishing Touches
We install several “ports” in the perimeter drain where a hose or dehumidifier drainage line can be inserted to allow for future testing or inspection. This helps us with testing and inspection during annual checkups and sump pump maintenance.
Our sump pump installation crew takes extra care to leave your basement clean, neat, and debris-free upon completion of the installation. We clean dust from the basement floor and remove all debris we create. Many customers comment that their basements are cleaner than before we started!

Step 6: Upgrading Your Basement
Once your basement is protected from water seepage, it’s a great idea to take advantage of the cleaner, drier, more attractive area as storage or living space.
If you don’t already have one installed, be sure to ask about our battery backup sump pumps, as well as our basement wall coverings, ENERGY STAR® rated dehumidifier, and other basement products that can add energy efficiency, beauty, and comfort to your home.
What Are the Benefits of a Groundworks Sump Pump Installation?
Our team understands how crucial a sump pump is to your basement waterproofing system. With Groundworks, you get more than just a sump pump installation; you receive expert evaluation of your home’s unique needs, top-quality products, and a system designed for long-term performance. This not only protects your basement from flooding but also safeguards your foundation, belongings, and overall property value.
Other benefits of choosing Groundworks for your basement sump pump installation include:
- Customized solutions
- Financing options for your project
- Warrantied products
- Annual maintenance checks
Trust Groundworks for Your Sump Pump Needs

Basement leaks can be a cause for concern, but they shouldn’t fill you with dread whenever the rain starts to fall. At Groundworks, we empower homeowners to conquer wet weather with confidence, offering reliable sump pump installations and comprehensive basement waterproofing solutions. Don’t hesitate to contact us today to schedule a free inspection and estimate.
Our team understands the unique wet weather challenges faced across North America. Our powerful sump pumps are engineered to handle even the heaviest of rains and flooding, ensuring your home remains a safe and dry haven. Trust us to protect your home from water intrusion for years to come.
Sump Pump FAQs
The cost varies depending on factors including the type of sump pump, the size of your basement, and other waterproofing installations. During a free inspection, your Groundworks inspector will provide you with an accurate cost breakdown of customized solutions—including a sump pump—along with various financing options.
We discourage DIY sump pump installations, as big-box store options are often expensive, temporary, and difficult to install. Don’t risk your home’s safety; trust your local Groundworks company to recommend basement waterproofing solutions customized to meet your needs.
Regular inspections are key to a properly functioning and long-lasting sump pump system. When Groundworks installs your basement sump pump, you can enroll in our annual maintenance program to ensure your system continues to protect your home.